1. PhotoTrove Overview
1.1. About this document
Copyright © 2018, 2019, 2020, 2022, 2023, 2024 Theodore B. Ruegsegger. The source components of this document are written in asciidoc markup and used to generate a finished manual in HTML, PDF or other formats as needed.
1.2. The Problem
Now that we all have digital cameras that never run out of film, more and more of us are finding it difficult to keep track of all our photos and videos. It’s easy to accumulate tens of thousands of photos in a short time, and sticking them into labeled folders on our computers works about as well as when we kept our prints and negatives in shoeboxes. Why not use all this computer power to do the housekeeping for us?
1.3. What Is PhotoTrove?
PhotoTrove uses an industrial-quality database management system to keep track of every photo and video in a large collection, with detailed descriptions, timestamps and locations so you can find them easily, edit them, group them, compare them, arrange them and conveniently publish them. It includes a comprehensive search tool as well as easy handoff to your favorite photo-editing tools.
PhotoTrove runs as a web application on your local network, so
multiple users can work independently and simultaneously. Anyone whose
browser can see the PhotoTrove server
[Server: Don’t be put
off by the word server; PhotoTrove can easily run on the same
machine as your browser, perhaps as a virtual machine running on your
laptop.]
can view photo sets and albums, carry out searches and
download individual photos, but only authorized users can change
anything. Since all the data is in one place, it’s easy to set up
automatic backups so you can be confident your valued photos are safe.
1.4. What Isn’t It?
PhotoTrove is designed to serve clients on an internal network (or a single machine), not the open Internet.
While PhotoTrove does let you assemble photos and videos from anywhere in your collection into albums for publishing, the resulting albums are nothing fancy, just a series of linked pages containing your photos, videos and captions that can be burned to a CD or DVD, copied to a thumbdrive or uploaded to a static website. There are many applications as well as web services available that let you arrange a set of photos into a visually stunning album. If that’s what you want, use PhotoTrove to find and collect the particular photos you want and then hand them off to an album-finishing tool or service.
1.5. Features
With PhotoTrove and your favorite web browser, you can:
-
Keep track of all your photos and videos, with descriptions, timestamps and locations.
-
Edit the images and videos using your favorite tools, with special support for stitching panoramas.
-
Make up descriptive tags and attach them to any photos you wish, to enable complex searches and group actions.
-
Locate photos in your collection, searching by pretty much anything: date range, location, text in descriptions and captions, tags, etc. and then carry out group operations on all matching photos.
-
Assemble albums by selecting images from multiple photo sets and adding layout and captions.
-
Publish albums as collections of static HTML documents that you can copy to a CD, DVD or thumbdrive or upload to a website. Yes, they’ll still play videos
[Playing videos: At this writing, some browser/platform combinations (Microsoft Edge, most browsers on smartphones) still can’t play Theora videos directly in the browser, but they can download the original format video and play it in a different application.]
in the browser, either way.
1.6. Sample Albums
Here and here are some sample albums produced using PhotoTrove and its predecessor the Photo Album Manager. Note that they make little use of style sheets, but that can easily be added. I welcome suggestions for a nice default style, or perhaps a set of user-selectable styles. Naturally, I also welcome URLs for sample albums to add to this section.
1.7. System Requirements
PhotoTrove is a web application written mainly in PHP using the Apache web server and the PostgreSQL database management system. It also makes use of the GraphicsMagick graphic tool collection, the ffmpeg video converter and the oggvideotools set, the MPlayer video player/analyzer, the ExifTool metadata reader, and traditional Unix tools like Bourne shell, cat, grep, sort, tr and sed.
For more details, see the Architecture and Design appendix.
-
To run the Trovester “appliance” you need only a computer with sufficient speed, memory and disk space running any of the more common operating systems. More specifics in the Trovester chapter.
-
To run your own PhotoTrove directly on a machine (real or virtual):
-
That machine must run some version of Debian or Ubuntu GNU/Linux if you’re going to use EasyPhotoTrove to set it up, because that’s what EasyPhotoTrove knows how to use. If you want to set up the whole thing yourself, any recent version of GNU or Unix that supports the required packages should do.

Another advantage of EasyPhotoTrove, which also applies to Trovester since it’s built with EasyPhotoTrove, is that you can upgrade automatically to the latest version of PhotoTrove.
-
You’ll need sufficient disk space for all the images in your collection; this can vary widely depending how many photos and videos you take and at what resolution. Say a few tens of gigabytes to get going. Be sure to allow for backups!
-
1.8. License
This collection of program code and documentation is free software; you can redistribute it and/or modify it under the terms of the GNU General Public License as published by the Free Software Foundation; either version 3 of the License, or (at your option) any later version.
This collection is distributed in the hope that it will be useful, but WITHOUT ANY WARRANTY; without even the implied warranty of MERCHANTABILITY or FITNESS FOR A PARTICULAR PURPOSE. See the GNU General Public License for more details.
You should have received a copy of the GNU General Public License along with this collection; if not, write to the Free Software Foundation, 51 Franklin Street, Fifth Floor, Boston, MA 02110-1301, USA.
2. Photo Management Overview
|
|
The instructional sections of this manual use certain terms in very specific ways. To avoid confusion, refer to the Glossary. For a pictorial representation, have a look at the Data Model. |
-
Get them into PhotoTrove:
-
By hook or by crook, upload the photos from the camera to the
originalphotosarea. -
In your web browser, open PhotoTrove and log in
[Browser login: Unless otherwise noted, assume the user account has the required privileges to edit photos and albums and/or to publish albums, as the case may be. Your browser must allow Javascript and accept cookies from the PhotoTrove server and, if prompted, accept the self-signed security certificate.]
. -
Import the photos as a photo set.
-
-
Edit the new photo set:
-
Look the photos over, rotate as needed, cull obvious rejects.
-
Set locations, enter descriptions.
-
Compare similar pictures, cull some more.
-
Edit individual photos offline, as needed.
-
Annotate the whole photo set.
-
-
Browse photo sets
-
Browse albums
-
Search
-
Assemble a photo album:
-
Add photos to the album from thumbnail galleries of photo sets or search results.
-
Edit the photo album.
-
-
Tag photos
-
Share individual photos
-
Publish an album:
-
Generate a publishable copy of the album.
-
“Burn” the copy to a CD or DVD or to a thumbdrive.
-
Upload the copy to a website.
-
Make your own Internet website.
-
-
Set up backups:
-
Choose a backup strategy.
-
Set up automatic backups.
-
Test your backups.
-
3. Getting Photos into PhotoTrove
More and more devices can take pictures these days, and they store those pictures in many different ways, so we need to be flexible and resourceful in transferring those pictures to the PhotoTrove server. All that matters is the result:
-
The photos should be uploaded to the server in their own folder under the
originalphotosfolder (/home/public/photos/). -
Each individual photo folder must have a name
[Appropriate folder name: I recommend a timestamp, either the time when uploaded or that of the most recent photo, e.g.,20220614-180204, so the folders sort nicely in the menu. Whatever format you choose, be consistent. Avoid spaces in folder and file names.]
that-
is a legal file name, that is, without spaces or special characters;
-
is unique;
-
sorts usefully among the other folders.
-
In order to upload photos to the PhotoTrove server, you must either:
-
wrap the photos in a single archive file (zip or tar), which you can upload directly on the Import a photo set page, or
-
have a user login account on the server and use some file transfer method (e.g., scp or one of the scripts below), or.
3.1. Accessing the Images on the Camera
Depending on the camera and client computer (the one from which you’re
connecting to PhotoTrove, not the server
[Client: As noted
previously, the client and server could be the same machine.]
)
platform, there are several ways to access the photos. Most cameras
have a folder named dcim or DCIM, per the
Digital
Camera IMages specification, containing one or more
subfolders with images.
-
You can remove the flash memory from your camera (typically an SD or micro-SD card) and connect it to your client computer via a USB adapter or directly into a memory card socket, if your computer has one.
-
You can connect your camera to your client computer via a USB cable; some cameras will connect immediately, some need to be turned on.
-
Some cameras or smart phones may connect via Bluetooth or even directly to a wireless network.
Whatever you do, verify that your computer sees a dcim folder,
preferably as the top of the mounted flash drive.
|
|
Some phones won’t make their filesystems visible to a computer, so you’ll need to use some other method to transfer the photos. For iPhones there are several file transfer apps that let you download the photos, typically as a zipped archive, to your regular workstation. For what it’s worth, I’ve been happy with the file transfer app actually named “File Transfer App” by Evgenii Shcherbinin. The app zips up the images and sets up a simple web server on the local network. I download the zip file to my desktop via a web browser, then upload it directly into PhotoTrove. |
|
|
Newer iPhones store images in the HEIC format rather than the familiar JPEG. Alas, the rest of the world, including the tools underlying PhotoTrove, doesn’t yet support HEIC, so you’ll need to convert the files to JPEG. Somewhere in the settings you can tell the phone to do this automatically when transferring files, so you don’t have to rely on your file transfer app to get it right. |
3.2. Transferring the Images to originalphotos
This also depends on server configuration, client platform and camera.
-
Upload as a zip or tar file: This is probably the simplest since there’s no need to log in directly to the server, and every platform can create such files easily (and smartphone apps like the File Transfer App mentioned above will do it for you). If you have a zip or tar file, you can skip the rest of this section and go directly to Importing the Photos as a Photo Set, below.
-
fotoxfer.shon GNU or Unix client: If thedcimfolder is the top folder and your client computer is running some version of GNU or Unix, you can run thefotoxfer.shscript. If it’s not already installed, you can find it in the PhotoTrove distribution asscripts/fotoxfer.sh; copy it to the execution path (typically in/usr/local/bin/). The script will mount the flash drive, copy the images to the server under a folder with a unique (timestamped) name, verify that the copy succeeded, ask if you wish to erase the flash drive and, finally, unmount the flash drive so it’s safe to remove it. For details, type:fotoxfer.sh -h
If, like me, you carry both a smart phone and a dedicated camera, you very likely will be making two photo sets over the same time period, covering the same subjects. After you import them, it may make sense to merge them, using the Move photos between sets option from the menu. Since both cameras and phones number images sequentially up to
9999and then start over at0001(and many use the same prefix, typicallyIMG_, for the filenames), it can sometimes happen that the two photo sets contain images with the same filenames. I avoid name conflicts by using the -l option in thefotoxfer.shscript (Force filenames to lowercase) when importing camera images, and leaving phone images uppercase. -
fotoupload.shon server: If thedcimfolder is the top folder and your server is conveniently accessible, you can connect the camera’s memory to the server’s card socket or USB port, log in to the server and then run thefotoupload.shscript, which does exactly the same asfotoxfer.shbut locally. For details, type:fotoupload.sh -h -
MobaXterm on Windows client: This GPL tool will take care of everything, including file transfers, logging in to the server, even displaying X11 applications. To transfer photos:
-
Launch MobaXterm and start an SFTP session to the PhotoTrove server with initial directory
/home/public/photos. -
In the remote window, make a new folder with an appropriate name
[foldername]
. -
Still in the remote window, open the new folder.
-
Using your Windows file manager, navigate to the new photos and drag them into the remote window. MobaXterm will transfer the images over the network.
-
Optionally, erase your camera’s
dcimfolder. -
Release and remove the flash memory or camera.
-
-
Other tools on Windows client: There are numerous ssh and file transfer tools for Windows, for example, PuTTY, FileZilla, WinSCP, and Cyberduck, to name a few. If you’re accustomed to a particular tool, use that to:
-
Create a new folder under
/home/public/photos/on the PhotoTrove server with an appropriate name
[foldername]
. -
Transfer the images from the
dcimfolder to the new folder. -
Optionally, erase your camera’s
dcimfolder. -
Release and remove the flash memory or camera.
-
-
MacOS X client: SSH and file transfer tools include Fugu and Cyberduck. If you’re accustomed to a particular tool, use that to:
-
Create a new folder under
/home/public/photos/on the PhotoTrove server with an appropriate name
[foldername]
. -
Transfer the images from the
dcimfolder to the new folder. -
Optionally, erase your camera’s
dcimfolder. -
Release and remove the flash memory or camera.
-
3.3. Importing the Photos as a Photo Set
-
In your web browser, open PhotoTrove and log in
[BrowserLogin]
.
Take advantage of your browser’s tab capability. Once you’ve logged in, open menu items in a separate tab. Not only does this leave the main menu available at any time, it allows you to recover from session time-outs by reloading the first tab, thereby repeating the login.
-
From the main menu, select Import a photo set.
-
Select the desired folder from the menu, or select a zip or tar file to upload. If the latter, accept the suggested folder name or edit to suit. Once uploaded, the folder will appear in the folder menu. At that point there’s no further need for the zip file, so you can delete it from your client.

-
Review the settings. In particular, if your camera’s clock is set to local time rather than UTC (Coordinated Universal Time, aka Greenwich Mean Time), select the local time zone. If your camera is using some different time zone, don’t worry: you can adjust times and timezones later. Unless you never travel, I recommend setting your camera to use UTC/GMT without adjusting for daylight saving. This isn’t an option for smart phones, which always use the local time zone wherever they are.

PhotoTrove comes “out of the box” with the default time zone set to UTC. You can change this by editing the file
/home/web/webroot-ssl/trove/local/loc_env.phpand changing:define ("DefaultCameraTimeZone", "UTC"); //define ("DefaultCameraTimeZone", LocalTimeZone);to:
//define ("DefaultCameraTimeZone", "UTC");
define ("DefaultCameraTimeZone", LocalTimeZone);
(the double-slash makes the line a comment).
-
Click Create Photo Set. It will cook for a while, depending how many photos or videos are in the set, how large they are, and how fast your server is.

-
When it finishes, you can edit the new photo set or import another one.


4. Editing a Photo Set
Open the Photo Set Worksheet page, either by clicking Edit this photo set after importing it or by selecting Edit photo sets from the main menu and selecting the desired set.
4.1. Editing Many Photos

Below the action widgets you’ll see a thumbnail gallery of all the photos and videos in the set. Things you can do here:
-
Select photos: You can click the checkboxes (or the filenames) of individual thumbnails, or you can select one or more sequential ranges of thumbnails by selecting the first and last of each range, then clicking Select Range, or you can click Select All.

Before carrying out any actions, scroll down and verify that you really did select the pictures you intended.
-
Clear all selections by clicking Clear Selections.
This is the safest way to reload the page.
-
Carry out actions on all selected photos. Assigning locations and descriptions, turning and deleting photos are self-explanatory. Albums and tags are discussed in more detail later.

For convenience when assigning locations, descriptions or tags, you can hide from the gallery all the thumbnails that already have them assigned.
4.2. Editing Individual Photos
Clicking any individual thumbnail opens the webpic view in a separate tab.

Things you can do here:
-
Assign location and description, rotate, and delete, just as in the thumbnail gallery.
Many cameras and smart phones now use the Global Positioning System (GPS) to include location information (latitude, longitude, altitude) in each photo’s metadata (“geotagging”). If the image includes geolocation data, the latitude, longitude and altitude will appear under the location line as an active link. Clicking it will open a web application called GeoHack which lets you see the coordinates in your choice of dozens of mapping services:
+

-
Assign a timestamp. Normally the import process extracts the timestamp from the photo’s EXIF data, but some photos won’t have that. If you need to adjust the time for many photos because the camera’s clock or time zone was off, use the Adjust Timestamps tool from the main menu. If you need to assign a date to a lot of photos, for example, scanned slides, use the Apply Dates tool.
-
Download the full-size image, for example, to edit it.
-
Replace the image with a new version.
Note that in the webpic view, clicking on the right or left margin of the image moves forward or backward through the photo set. For videos, small navigation arrows below the video server the same purpose.
Finally, back on the Photo Set Worksheet page, you can click the Edit Notes button to annotate the photo set as a whole. You can enter a nickname, which is any descriptive text that helps you identify the set. You can also enter any notes you wish. If you’ve entered locations and descriptions for all the photos, the Summarize Descriptions button will be a good start. Be sure to save changes.

4.3. Checklist for a New Photo Set
-
Select and rotate any images that need it.
-
Look the photos over and cull obvious rejects.
-
Set the locations, selecting from the menu or creating new ones as needed.
-
Enter the descriptions.
-
Compare similar pictures, select the best, delete the others.
-
Download, edit and replace individual photos as needed.
-
When all are done, annotate the photo set with nickname and notes.
-
Search for similar images in other photo sets, compare and cull.
5. Finding Photos
Anyone whose web browser can see PhotoTrove can look through the entire collection, no login required.
5.1. Browsing Photo Sets
Much of the time, we look for photos taken around the same time, in photo sets. If we’ve named the sets with timestamps and given them helpful nicknames, they’re easy to find.
From the main menu, select View photo sets and scroll through the menu.

When you select a set, you’ll see the notes followed by the thumbnail gallery.

If you’re logged in, you’ll see an Edit Set button to the right of the notes. Clicking that will open the familiar Photo Set Worksheet page.
Clicking on an individual thumbnail opens the webpic view (but without the editing widgets).

5.2. Browsing Photo Albums
To show off our photos, we look through our photo albums. From the main menu, select View albums and scroll through the menu. When you select a photo album, you see the finished product.
Creating and editing photo albums is covered below.
5.3. Searching
The real power of PhotoTrove is the search screen, Search for photos in the main menu. You can specify just about any criteria and find all photos that match.

After you press Search you’ll see the familiar thumbnail gallery of matching photos. If you’re logged in, you’ll see the selection buttons and action options above the gallery.
If your search finds more matches than the specified limit (Limit results near the bottom) PhotoTrove automatically checks the box Display only first and last matches which not only does precisely that but, if you’re logged in, automatically selects all matching photos for action.
6. Organizing Photos
6.1. Assembling a Photo Album
Having all your photos neatly annotated and accounted for is better than having a shoebox full of prints, but it doesn’t offer much flexibility when you want to display them. For that, you’ll want to organize your best photos into albums. Your audience can browse albums directly in PhotoTrove, or you can upload them to a static website, or you can burn them to a CD, DVD or thumbdrive, viewable on any computer.
All album operations (except just viewing one) assume you’re logged in to PhotoTrove.
You could just select Edit albums from the main menu, type an album
name
[Album name: An album name must be a legal file name, an alphanumeric followed by alphanumerics, underscores or hyphens, with no embedded spaces or “weird” characters. Not to be confused with the album’s title, which can be pretty much anything.]
into the field at the top and click Create, but most
often you’ll just create an album on the fly as you add photos to it:
-
Open a thumbnail gallery, either a photoset worksheet page or search results;
-
Select one or more photos;
-
In the Album: action option above the gallery, enter the album’s name
[albumname]
in the field labeled New Album name. This is just convenient identifier for the album, not to be confused with its title.
-
Click Append.


Adding photos to an already-existing album works exactly the same way, except that you choose the album from the menu.
From the main menu, open the Edit albums tool and select the desired album. The Album Worksheet page displays all the photos on Page 0.

Page 0 serves two purposes:
-
It’s a convenient holding area for photos appended to the album, so you can move them to other pages.
-
It serves as the front, or title, page for the album, displaying no photos except an optional title picture.
You create album pages by moving photos to them. You can rearrange the photos on a particular page using the drop-down position numbers in the corner of each thumbnail.

Of particular interest is the Edit Page Text and Format button, which opens a separate tab where you can set the color scheme for the entire album and heading, text, and title picture for each page.


You can, at any time, see how the album will appear to others by clicking View Album.


6.2. Tagging Photos
There are innumerable ways to group photos, some temporary:
-
Candidates for an upcoming contest;
-
Timestamps to adjust;
-
Panorama segments to stitch together;
Some long-term:
-
Legal records;
-
Recipes;
-
Menus of favorite restaurants;
-
Favorites.
PhotoTrove lets you make up any number of descriptive tags, attach them to any photos you wish, and then treat the tagged photos as a group:
-
Like albums, you create tags on the fly in the Tag name action option above any thumbnail gallery.

-
Some tools, like Move photos between sets, Adjust timestamps, Apply dates, and Capture geo-data use tags to identify the photos in question.
-
The Assemble a panorama tool looks for the predefined tag “panorama-to-do”.
-
The Search for photos tool lets you combine tags and logical operators to make complex queries. It has two drop-down menus of tags, and in each one you can select “any of”, “all of”, or “none of” multiple tags (just hold down the Control key to select more than one from the menu). All the other search criteria are still available, as well.

-
To remove a tag from one or more photos, use the Search for photos tool to select them. The action options above the thumbnail gallery will include an option to “Untag selected photos”.


7. Sharing Photos
|
|
Many cameras and smart phones now use the Global Positioning System (GPS) to include location information (latitude, longitude, altitude) in each photo’s metadata (“geotagging”). This is a valuable capability but also poses a risk: When you share photos on social media or publish albums, be advised that anyone can extract this information and determine, for example, exactly where you live. There are various tools available to strip geotagging, or all metadata, from photos; details depend on your platform and the specifics of your photos and videos. |
|
|
Recent versions of PhotoTrove can automatically strip geotagging metadata from photos and videos, as described in Publishing a Photo Album, below. |
7.1. Sharing Individual Photos
It’s easy to download an individual photo from PhotoTrove to your client machine, whence you can email it, upload it to a website, or post it to your favorite social media site. You need not be logged in to do it.
In any thumbnail gallery, click on the desired image to open the webpic view. You now have a choice:
-
For many uses, the webpic-sized image you’re seeing in front of you is perfectly adequate; since it’s usually much smaller than the full-size image, it saves on space and network bandwidth. To download the webpic, just click right in the middle of the image and follow your browser’s instructions.
-
Sometimes only the full-size image will do. To fetch that, click the Full Size link and follow your browser’s instructions.
For videos, there’s a similar choice, not of size, but of the video/audio encoding scheme (or “codec”).
-
The webpic view is in the Ogg Theora format, one of the few currently playable directly in browsers that support HTML5
[playvideos]
. To download that, right-click in the middle of the video window, select something like “Save video as…” and follow your browser’s instructions. -
You can also download the video in the original codec recorded by the camera. To fetch that, click the Original-Format Video link and follow your browser’s instructions.
7.2. Publishing a Photo Album
Once you have an album built, you can view it at any time; the separate pages will be generated on demand. You can also use PhotoTrove to write all the data to its own folder as a set of static web pages, which you can then upload to a static website or burn to a CD, DVD or thumbdrive. And yes, everything will still work, including the video player.
|
|
Since the album is just a set of relations in the database, it takes up negligible disk space. Even if you make a static album, all the images are links, rather than copies of the image files, so there’s still no significant burden on your resources. On the other hand, when you copy the static album elsewhere, none of this applies, and it will take up more space. |
To publish an album:
-
Log in
[BrowserLogin]
to PhotoTrove, open the Publish albums tool and select the desired album.
PhotoTrove can automatically strip geotagging metadata from photos and videos and does so by default unless you uncheck the box. This affects only the published copies of the images; the original photos and videos in the photo sets are unchanged, retaining geotagging if present.
I’ve tested this with iPhone and Android photos and videos as well as the internally generated
.oggvideos, but can’t guarantee it will work with all formats. If you find a photo or video whose geotagging PhotoTrove can’t remove, please give me a sample so I can find a way to handle it. -
Click the link to view the album in a separate window or tab.
-
If space is short at the final destination, you can opt to omit the full-size images.
-
Click Write.

-
Click the link to view the written album and verify that it looks identical to the regular generated one.


You can write more than one album, in which case PhotoTrove
automatically updates the index.html file with links to each one.
To retrieve a written album from PhotoTrove server, select the one you want from the Download ZIP file of an album menu, then click Download.
|
|
If you’re downloading more than one album, be sure to copy the
|
|
|
Written albums can get pretty big, especially if they contain videos. Even in these days of abundant memory and fast networks, they can take up significant time and space. Don’t be surprised if PhotoTrove takes several minutes building the ZIP file and another several minutes once you’ve said where to download it. |
At this point you can unzip the file and
-
Transfer the files to a website;
-
Burn the album(s) to a CD or DVD;
-
Copy the album(s) to a flash drive.
|
|
When you’ve copied the album files where you want them, there’s no
particular reason to keep the written album files on the server, since
you can regenerate them whenever you wish. The Publish albums page
has a convenient feature that deletes selected written albums and
adjusts the |
If you’d like to display the album on the web but don’t have access to a website, you have some options:
-
Various organizations offer free web hosting. One I like is sdf.org aka freeshell.org aka paunix.org, which offers much more and is worth a look in any case.
-
Paid web hosting is getting less and less expensive, but is still a bit much just to display photos occasionally.
-
If you know what you’re doing, you can run your own webserver and make it visible to the Internet by tweaking your firewall settings for port-forwarding. Be careful; if possible, set up a “DMZ” with no access to your internal network.
-
Thanks to a recently-released program called
ngrok, you can run a webserver on your own local network, behind your firewall, and still make it visible to the internet, without the tricky and risky business of tweaking your firewall for port-forwarding. Since web service doesn’t call for much processor horsepower, you can use any spare machine for this, or a virtual machine, or something like the credit-card-sized Raspberry Pi. Like the PhotoTrove server, the web server won’t need a monitor, keyboard or mouse, at least not after you’ve finished setting it up.
|
|
These options are for displaying published albums on the web, not your PhotoTrove server itself. |
8. Safeguarding the Collection
Be sure to have some reliable method of backup and recovery for your photo collection that doesn’t depend on conscientious, repeated actions by human beings; it should be as fully automated as possible.
And don’t forget to include database dumps (the data exported to a structured text file) in the backups.
8.1. Dumping the Database
When you’re logged in, it’s a good idea to click the Export database
tool in the main menu every so often, and certainly before you log out
at the end of a session. This saves the entire database as a
specially-formatted text file from which the database management
system can rebuild everything. Database dumps will accumulate under
/home/public/dumps/ but don’t worry; older ones get purged so there
will never be more than 8 dump files.
8.2. Backup Strategies
You need a place to save the photos and database dumps.
-
The simplest solution is to attach an external disk drive. A nightly
cronscript should dump the database, mount the drive, mirror all the relevant files on it and then unmount the drive. -
If you have another computer with adequate disk space, you could use it as your backup server (or you could dedicate a machine for this purpose). Again, a nightly
cronscript should dump the database and then mirror the files over the network usingrsyncor something similar. You’ll need some ssh key-management system, likekeychain, to allow unattended yet secure transfers. -
As long as you’re doing your backups over a network, you may as well use a computer that’s geographically separated, like a friend’s house.
rsyncusessshto transfer the files over an encrypted tunnel. Of course, file transfers over the Internet are a lot slower than over a local network, so you should probably have a local backup for speed and then replicate that one to the remote site.
Whatever method you use:
-
Ensure that it happens automatically (but allow ad hoc backups by users at any time).
-
Verify that the automatic backup actually took place, perhaps by having it leave a log in a user’s home directory.
-
Test the backups from time to time to ensure you can restore from them; otherwise, what’s the point?
9. Assembling Panoramic Photos
A panorama is an assembly of multiple overlapping images to create a single image with an extra-large field of view. Typically, you create a panorama with these steps:
9.1. Taking Panoramic Photos
The general idea is to take a series of shots, either left-to-right or right-to-left, with some overlap (say a third) between each photo and the next. Keeping the whole series level is tricky, and a tripod can help here.
Many cameras offer features (“panorama assist” or “stitch assist”) to help align successive images with consistent focus and exposure. Moreover, they identify photos that are panorama components with distinctive filenames or even separate folders, as well as including some indicator in each image’s EXIF caption.
Some cameras and smartphones let you create a panorama on-the-fly, carefully rotating the camera in place. Again the image’s EXIF caption will contain some indicator.
But if your camera lacks those features, don’t despair; a little practice will do the job well enough that the increasingly-smarter panorama stitching software can take care of the rest.
Whenever you import a photo set containing panorama segments, be sure to tag them with “panorama-to-do”. PhotoTrove will do this automatically whenever the EXIF caption so indicates.
9.2. Stitching the Panorama
-
Log in
[BrowserLogin]
to PhotoTrove and open the Assemble a panorama tool.
-
It will offer a menu of all photo sets containing panorama segments. Select one.
-
You’ll see a thumbnail gallery for the photo set, with panorama components highlighted. Select the ones you wish to assemble, typically using Select Range.

-
When the complete series is selected, click Continue.

-
Verify that these are the photos you want and click Download. The images will be downloaded to your client wrapped up in a single ZIP file.
-
On your client computer, unpack the ZIP file. Voilà! Here are the files. At this point you can delete the ZIP file if you wish.
-
Use your favorite panorama-stitching tool to assemble the components into a final large image. I strongly recommend Hugin (http://hugin.sourceforge.net/). The days of stitching panoramas by hand are fortunately behind us, except for some unusual cases.
-
You might wish to edit the panorama further, in which case use your favorite photo editor.
-
When done, return to PhotoTrove’s panorama page (you may have timed out and need to reload the tab where you logged in) and upload the finished panorama. After a while you’ll see the thumbnail gallery again, with a button at the top that will display the finished panorama for your review.


-
PhotoTrove will assign each finished panorama the tag “panorama” for future retrieval and replace the “panorama-to-do” tag with the “component” tag for each of its components.


10. Tips and Tricks
Some handy ways to use PhotoTrove more efficiently and enjoyably:
-
PhotoTrove uses certain terms in very specific ways. To avoid confusion, refer to the Glossary. For a pictorial representation, have a look at the Data Model.
-
Take advantage of your browser’s tab capability. Once you’ve logged in, open menu items in a separate tab. Not only does this leave the main menu available at any time, it allows you to recover from session time-outs by reloading the first tab, thereby repeating the login.
-
If you need to refresh a thumbnail gallery to see changes you made in other tabs, don’t reload the page! Your last action on that page may have been, say, “rotate images” and reloading the page will repeat that action while you gnash your teeth in annoyance.
The best way to refresh any thumbnail gallery is to click Clear Selections. For similar reasons, don’t use the browser’s Back button.
-
The single exception to that rule applies when you need to perform more than one action on a range of images. For example, you have four panorama segments, and you want to tag them and assign a location and assign a description:
-
Select the range;
-
Apply the tag “panorama-to-do”;
-
Hit the browser’s Back button to re-select the range;
-
Assign a location;
-
Hit the browser’s Back button to re-select the range;
-
Assign a description.
-
-
When searching by date/time:
-
Note that PhotoTrove is pretty smart about interpreting dates. You can enter things like “yesterday” or “last Wednesday”. If you specify a date without a year, it will assume the current year.
-
Specifying a date but no time means the midnight that begins that day, in the local time zone of the server.
-
Specifying a start date but no end date means “on or after the start date”. Similary, specifying an end date but no start date means “before the end date”.
-
-
When searching, it’s tempting to erase the criteria for a previous search and enter new ones, yet sometimes the results come out wrong because you overlooked some field. Solution: when starting another search after completing one, use the Reset button to clear everything.
-
Clicking Search with no criteria set will find all photos in your collection. Since you probably have more than the default limit of 400, it will display only the first and last, but it’s a quick way to get a count of all your photos. It’ll also tell you how many are missing timestamps and locations.
11. Other Photo Set Operations
11.1. Adding Individual Photos
The Add single photos/videos does just that. First select the target photo set, then browse for the photo or video you want to add. Click Upload File, enter the appropriate metadata and add the new image.
11.2. Moving Photos Between Photo Sets
A photo set is the most basic grouping for photos and videos. Analogous to rolls of film, photo sets contain sequences of images taken during a single time period or at a single location. Photo sets can be fragmented: vigorous culling of similar photos can leave a photo set all but empty; a trip may start in the middle of one set and go on to span several later ones; some cameras start a fresh folder after a set number of shots or for every panoramic sequence. In such cases, some housekeeping can help organize photo sets more logically and efficiently.
-
Use the “Tag selected photos” feature in any thumbnail gallery to assign a particular tag to those photos, and only those, that you want to move to a particular target photo set;
-
Select Move photos between sets from the main menu;
-
Select the appropriate tag;
-
Specify the desired photo set;
-
Click the Move tagged photos… button to move the photos;
-
When the photos are where you want them, click Untag All.
11.3. Deleting an Empty Photo Set
When a photo set contains no more photos, perhaps because you’ve deleted the last one or moved it elsewhere, you’ll see a button offering to delete it.
Of course, this won’t affect the original folder under
originalphotos, but don’t worry, PhotoTrove remembers the folder
names of deleted photo sets so they don’t reappear in the menu of
folders to import!
11.4. Adjusting Timestamps
Photo Trove saves photo timestamps in Coordinated Univeral Time (UTC)
and displays them in the current local time
[Local time: this
means the time zone of the PhotoTrove server (just in case you’re
using PhotoTrove from far away!)]
. Sometimes photo timestamps are
incorrect by a fixed amount, perhaps because the camera’s clock was
set to a different time zone or because the clock was simply wrong.
The Adjust timestamps tool adjusts the timestamps for any number of
photos in a single action.
-
Use the “Tag selected photos” feature in any thumbnail gallery to assign a particular tag to those photos, and only those, whose timestamps you wish to adjust by the same amount;
-
Select Adjust timestamps from the main menu;
-
Select the appropriate tag;
-
Enter the desired time adjustment and direction and click Set;
-
When the timestamps are correct, click Untag All.
11.5. Applying Dates
Sometimes photos have no timestamps, for example, digital scans of slides, negatives or prints. In such cases, the approximate date may be known, though not the precise time. The Apply dates tool applies a date (with time 00:00:00 local) to selected photos.
-
Identify all photos for which you want to set the dates.
The Search for photos tool can find photos whose date/time is unset.
-
Use the “Tag selected photos” feature to assign a particular tag to those photos.
-
Select Apply dates from the main menu;
-
Select the appropriate tag to display a thumbnail gallery;
-
For each date you wish to set:
-
Use the Select Range feature to select the individual photos to which it applies;
-
Use the calendar to specify a date, or enter the date as text;
-
Click Apply.
PhotoTrove will apply the date to all the selected photos and remove the tag, so they disappear from the thumbnail gallery.
-
-
Repeat for every date you wish to apply.
For convenience, the date in the calendar box remains set between operations, since the next date is likely to be closer to that one than to today’s date.
11.6. Capturing Geo-Data
Many cameras and smart phones now use the Global Positioning System (GPS) to tag photos and videos with latitude, longitude, and altitude (“geotagging”). PhotoTrove captures this information from any photos or videos newly added to the collection, records it in the database, and displays it along with the named location as a hyperlink to geohack.toolforge.org so that you can see the location on your choice of map.
If your collection contains photos and videos added before PhotoTrove acquired this capability but which might be geotagged, you can use the “capture geo-data” tool to extract and record whatever geo-data they contain. The tool accomplishes this by examining the metadata in the actual image or video; this can take some time for a large number of them, so try it with small batches first.
-
Use the “Tag selected photos” feature to assign a particular tag to the photos and videos you want to check for geotagging;
-
Select Capture geo-data from the main menu;
-
Select the appropriate tag to display a table of the tagged photos, including any geo-data already recorded;
-
Click Capture geo-data for tagged photos.
Some time will elapse, then the table will regenerate; with luck there will be more geo-data displayed.
-
For convenience, click Untag All to remove the tag, since it’s no longer needed on these photos.
12. Housekeeping
As the collection grows, you’ll accumulate lots of metadata, including locations, tags and albums. Sometimes you’ll need to make changes. Sometimes you’ll find that your menus are cluttered with items you aren’t using much lately.
PhotoTrove has features to help manage menus and keep up with changes.
12.1. Managing Locations
The Manage locations tool lets you:
-
Change a location’s name;
This is particularly handy for the location “Home” since most of us reside in more than one place during our lives. Use just plain “Home” for your current address, and add a bit more detail, like the town, for previous addresses. When you move, edit the current “Home” to add a town and create a new Home for your new address. The full address and any other information of interest goes into the Notes field.
-
Add notes about a location, like full address or why it’s significant;
-
Designate a location as “archived” (or not). All this means is that archived locations don’t appear in menus.
12.2. Managing Tags
The Manage tags tool lets you:
-
Change a tag’s name;
-
Add notes about a tag, explaining what it represents;
-
Designate a tag as “archived” (or not). All this means is that archived tags don’t appear in menus.
12.3. Managing Albums
In addition to the regular album-editing operations, the Edit albums tool offers some occasionally-used housekeeping features. You can:
-
Change an album’s name
[albumname]
; -
Designate an album as “archived” (or not). All this means is that archived albums don’t appear in menus, handy for albums commemorating events from long ago;
-
Delete an album, though you’ll almost never want to do this, since an album takes up very little in the way of resources but typically represents a fair amount of effort. More likely, archiving is a better solution.
-
Add notes about an album for your personal reference, invisible to all but you. This feature is at the head of the Edit Page Text and Format page.
13. Playing with Matches
If you’re comfortable running shell scripts, you’ll find some useful
tools in the scripts/ subdirectory. They handle tasks that most of
us will rarely need; indeed, if you find you need any of them more
than rarely, let me know and I’ll make a web-based version as a
regular tool under PhotoTrove. I’ll describe them here.
|
|
Be sure you know what you’re doing. Running these scripts requires logging into a shell account on the PhotoTrove server. Consider reading over any script you’re planning to use so you understand how it works. |
|
|
Don’t experiment with scripts other than those described here! Most of those scripts are development scaffolding, installation components, or temporary solutions to tricky issues. Many of them were written for older versions of PhotoTrove and its predecessor, and will yield unpredictable, possibly destructive, results. You have been warned. |
13.1. Taking PhotoTrove on the Road
If you carry a laptop with you when you travel, you could install PhotoTrove on it—either directly or inside a virtual machine like Trovester—and then while away your evenings uploading photos and editing photo sets. But how do you get all that into your regular PhotoTrove server when you return home?
The answer is to configure your laptop PhotoTrove as a “travel
version”, set up exactly like the regular server except that the root
is one directory down, that is:
/home/web/webroot-ssl/trove/tvl/
instead of
/home/web/webroot-ssl/trove/
To set it up:
|
|
If you already have photos and data on the machine, dump the database and back it up together with the photos, because the following procedure will blow it all away. |
-
On your travel server, log into a terminal as a user with sufficient sudo privilege to become the webserver user “www-data”, in order to write to the
fullsizeandwebpicssubfolders (if you’re using Trovester out of the box, that user is xyzzy with passwordxyZZy!42). -
Create the tvl directory and move the whole service root into it:
cd /home/web/webroot-ssl/trove
sudo mkdir tvl
sudo mv * tvl/
[It will warn that it can’t move the tvl directory into itself.] -
Fetch, from the regular PhotoTrove server, a dump (gzipped is ok) of the latest version of the production
trovedatabase. -
On the travel server, run the script:
sh resettvl.sh dumpfile
where dumpfile is the path to thetrovedatabase dump.This will erase any photos from the travel environment and reinitialize the
trove_tvldatabase, preserving the production environment’s locations, tags and user accounts (with passwords and privileges). -
You’re ready to use the travel version; just browse to
…/trove/tvl/and log in as usual.
When you return from your travels:
-
Run the script with the help option:
sh integrate.sh -h
to display the detailed, step-by-step instructions. Note that you’ll need to move the image files manually. -
Transfer the zipped images and the
trove_tvldumpfile to the PhotoTrove server and unzip the images into the file tree, all as described in the instructions. -
On the PhotoTrove server, run the script:
sh integrate.sh trove dumpfile
where dumpfile is the path to thetrove_tvldatabase dump. -
Copy any uploaded camera folders in
home/public/photos/to the PhotoTrove server for archival purposes. -
Delete the leftover zip files on both hosts.
13.2. Cloning a Photo Album
Occasionally you might wish to make several similar albums, perhaps with a slightly different mix of photos, or a different text or page arrangement, but otherwise the same. The simplest way to accomplish this is to build an album as a “baseline” or “template”, make copies of it, and then modify the copies as needed.
Since an album is entirely a database construct, a script can do this.
Run the script:
sh clonealbum.sh database albumname newalbumname
where:
database is the name of the database, normally trove
albumname is the name of the original album to be cloned
newalbumname is the name for the new album to be created.
13.3. Copying a Page from One Album to Another
Sometimes you don’t need to clone a whole album but you might want to copy or move a page or two from one album to another.
Run the script:
sh copypagebetweenalbums.sh database album1 page album2
where:
database is the name of the database, normally trove
album1 is the name of the album that has the page
page is the number of the page to be copied
album2 is the name of the album to receive the copied page.
PhotoTrove appends the desired page as the last page of album2. Use Edit albums to move the page where you want it.
Glossary
The instructional sections of this manual use certain terms in very specific ways. To avoid confusion, this section explains their meanings and how they are related.
- album
-
An ordered set of album pages, with a title page.
- album page
-
An ordered set of any number of album photos with its own title, title picture and text, associated with a particular album.
- album photo
-
An association of a photo with an album page, with a distinct caption and display order. More than one album photo may be refer to a single photo, even on the same album page.
- title picture
-
An optional designation for each album page, identifying one of the album photos on the page to be displayed at the top of the page in an intermediate size.
- title page
-
A special “page zero” album page with a table of contents linking to the other album pages.
- original
-
A digital image or video, as recorded by the camera or other external source, uploaded to the
originalphotosarea, copied to the PhotoTrove image repository (as the full-size master image) and thereafter maintained in the archive for backup purposes. - photo
-
An aggregate entity comprising a full-size image, a web-sized image, a thumbnail image and associated metadata. Identified by a foldername (corresponding to the containing photo set) and a filename.
- full-size image
-
A full-sized digital image, initially copied directly from the uploaded original and thereafter maintained as the master image for editing.
- web-sized image, webpic
-
A reduced-size image suitable for viewing in a web browser or transmitting over a network. The exact dimensions of web-sized images are configurable (default and per-photo set).
- thumbnail image, thumbnail
-
A much-reduced image suitable for quick browsing and selection; generally multiple thumbnails will appear on a single screen as a “thumbnail gallery”.
- photo metadata
-
The PhotoTrove database retains information about the photo, including timestamp, location, description and geometry, some extracted from the image’s EXIF data, some derived automatically and some entered by the user.
- photo set
-
A set of photos and/or videos taken sequentially, in one or more sessions, but not necessarily otherwise related. Conceptually equivalent to a roll of film or the contents of the camera’s flash memory. Identified by a foldername.
- video
-
An aggregate entity comprising an original-format video, an oggfile, an associated still image and metadata.
- original-format video
-
A single file that comprises many images and, usually, a sound track, in the format recorded by the camera. Videos are handled the same as photos to the extent that makes sense.
- oggfile
-
A version of the video converted to the Ogg Theora format for convenient playback in HTML5-capable web browsers.
- still image
-
A photo that represents a video in the various “gallery” views of photo sets and albums. If the camera hasn’t automatically generated one, PhotoTrove will automatically extract a still from the oggfile for a newly-imported video.
- video metadata
-
Since the still image is a photo, most of the metadata is contained therein, but the database also tracks the video’s geometry.
Appendix A: Architecture and Design
PhotoTrove is built upon the GAPPKit, a framework for constructing web applications using GNU/Linux, the Apache web server, the PostgreSQL relational database management system and the PHP language.
Distribution
PhotoTrove comes as a zip file; when unpacked, it contains a tree of the following folders:

Application Code
The PHP code (under web/ in the distribution) resides under Apache’s
SSL service (https://) document root. My recommended location for
PhotoTrove’s code (and where
EasyPhotoTrove puts it) is
/home/web/webroot-ssl/trove/. The “regular” service (http://)
tree contains, at /home/web/webroot/trove/index.php, a redirector
page that switches to the SSL tree.
Four data subfolders are added within PhotoTrove’s code folder
/home/web/webroot-ssl/trove/ at installation:
fullsize/ and webpics/ contain the full- and reduced-size
images, respectively.
originalphotos/ is where PhotoTrove looks for new photos to
import; typically this is a symbolic link to somewhere more convenient
like /home/public/photos/ or, in the case of the Trovester virtual
appliance, a shared folder. PhotoTrove reads originalphotos/ (to
copy photos to fullsize/ when importing) but doesn’t write to it; it
serves as an archive for unedited originals.
albums/ is where PhotoTrove places published albums (trees of
static webpages) so they can be burned to a CD or uploaded to a
website. Each user gets an individual subfolder for published
albums. In the Trovester virtual appliance this is a symbolic link
to a shared folder. In a regular installation, it may or may not be
a link depending on convenience (users need only read access).
Data Model
I maintain the data model using pgModeler, which automatically generates the schema-building SQL scripts and ERA diagrams:

The central entity in the PhotoTrove model is, not surprisingly, the photo. Every photo is contained in a photoset, a sequential series analogous to a roll of film. A video is a separate entity associated with a single photo that serves as its still image, or thumbnail.
The location entity allows for a user-defined list of locations where photos are taken. Users may also define tags and apply them to photos to support complex groupings.
The primary product of PhotoTrove is photo albums that present collections of photos for display and distribution:
An album comprises one or more albumpages, each of which can contain any number of albumphotos. Each albumphoto is an instance of a photo in a particular position on a particular albumpage.
Albums, locations and tags may be archived; this means simply that they don’t appear in menus, but can be restored to regular status when needed again.
A separate ERA diagram depicts the common underlying architecture of GAPPKit applications, documented elsewhere:

Appendix B: Installation Options
There are three ways to run your own PhotoTrove:
-
The very easiest is to download the Trovester “appliance”, a self-contained virtual machine that will run on most recent computers. All you need to give it is disk space for your photos and albums.
-
The next easiest is to build your own PhotoTrove machine using EasyPhotoTrove, a set of scripts and configuration files that automates the installation. It makes good sense to dedicate a computer as a photo server so the members of your household can all use it. I build each release of Trovester by creating a virtual machine running Debian GNU/Linux, installing EasyPhotoTrove and then exporting the virtual machine as an appliance.
Another advantage of EasyPhotoTrove, which also applies to Trovester since it’s built with EasyPhotoTrove, is that you can upgrade automatically to the latest version of PhotoTrove.
-
Finally, you can install PhotoTrove on an existing machine that you also use for other purposes. Depending what’s on your machine and how you’ve configured it, you might be able to use EasyPhotoTrove to automate the installation. If you’d rather do the whole thing yourself and have the requisite system administration skills:
-
Start by downloading the entire EasyPhotoTrove and PhotoTrove packages:
wget http://toyrus.ngrok.io/~ted/easyphototrove/easyphototrove-latest.zip wget http://toyrus.ngrok.io/~ted/phototrove/phototrove-latest.zip -
Look over the scripts, beginning with
install.shand continuing with the ones in the respectivescripts/directories. -
Adjust as needed for your situation.
-
Email me if you need assistance, within reason.
-
Appendix C: Trovester, the PhotoTrove “Toaster” — a Virtual Appliance
An easy way to try PhotoTrove is as an “appliance”, a self-contained
virtual machine complete with its own operating system, supporting
packages and the PhotoTrove software. All interaction is via your web
browser and shared folders
[A shared folder is accessible to
both the host system and the virtual machine without the need for
networking.]
. Of course, since the Trovester virtual machine has its
own network presence, other users on your local network can use it at
the same time.
If you decide you like PhotoTrove, you can either install it directly or simply continue using Trovester as your permanent photo server.
System Requirements
If your computer is of relatively recent vintage, you can probably run Trovester, but check this list just to be sure:
-
A computer running any platform that can run VirtualBox
[VirtualBox: The appliance is distributed in the Open Virtualization Format, which I understand can run under other virtualization packages like VMware, but I haven’t tried that and don’t know if all the features will work.]
(GNU/Linux, Solaris, Mac OSX, Windows). -
At least 1 GB memory; Trovester uses 0.5 GB
[Memory: Of course, if you have enough memory, you can allocate more to Trovester and it will run faster.]
and you still need to run your host. -
Disk space adequate to hold your entire photo collection twice (since PhotoTrove lets you keep a separate archive of original photos unaffected by subsequent editing). All data, namely the photos and database dumps, are in a shared folder on the physical host (which can even be on an external hard disk). In addition, reserve ca. 4GB separately for the appliance (it probably uses about half that but could grow depending what you do with it). A few tens of gigabytes should do it until your collection grows huge.
-
A web browser running on your physical host, since PhotoTrove is a web application and Trovester is a server.
-
Whatever photo-editing software you prefer; I recommend GIMP for images and Avidemux for videos.
|
|
Make sure the host machine and the disk(s) where you plan to store your data are reliable. In particular, check the settings for suspending/hibernating/sleeping to make sure the host doesn’t go to sleep while Trovester is processing photos. |
Installation and Configuration
This boils down to installing VirtualBox, importing Trovester as an appliance, setting its network address, and defining the shared folder:
-
Install VirtualBox from virtualbox.org. The appliance was developed under the Free edition and uses none of the non-Free features. For some platforms, it may be difficult to obtain installable binaries of the Free edition, but the proprietary edition will work, too.
-
Download the Trovester OVA file, either the 64-bit version or the 32-bit version.
-
Using the VirtualBox Manager GUI, import Trovester (File/Import Appliance). Trovester will appear in the virtual machine list.
-
Select Trovester and then open the Network settings; verify that it’s using a bridged adapter.
-
Edit Trovester’s Shared folders settings to create a shared folder. This can be anywhere on the physical host, including an external or removable drive.

Be sure to name it
mytrovester, since that’s the name Trovester will look for.
Operation
-
If your shared folder is on a removable device, make sure it’s attached and mounted.

This bears repeating: Make sure the shared folder is attached and mounted!
-
Start Trovester. A console window will open and you’ll see the boot sequence while each process starts up and reports its status. At some point it will complain about failing to mount the external drive; don’t worry about that, it will mount it later in the sequence. It will finish with a
login:prompt. If you move your mouse over the network icon at the bottom of the window, it should display the IP address, although this doesn’t seem to work with all versions of VirtualBox. Alternatively, log in as xyzzy with passwordxyZZy!42, then typehostname -Ito display the IP address. Here’s a screenshot showing both: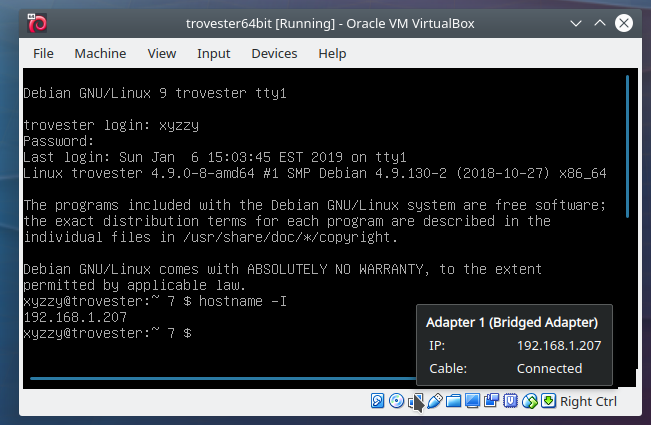

As built, Trovester gets its network address from the local DHCP server. Unless you’ve explicitly set up a separate DHCP server, it’s probably your router or wireless access point.
Typical home routers give out addresses with long lease times so Trovester’s IP address is unlikely to change often, unless you have lots of machines coming and going on your network.
If you want to ensure that Trovester’s IP address never changes, you’ll need to log in to your router via your browser to reserve an IP address for Trovester’s MAC address (which you can see in the VirtualBox network settings). Once you’ve done that, you can modify your client machine’s
hostsfile
[hosts file: for GNU/Unix,/etc/hosts. For Windows,C:\Windows\System32\drivers\etc\hosts.]
so you can access Trovester by name. -
Since all regular PhotoTrove actions are accomplished through the web browser, there’s no need to log in at the Trovester console window. Minimize this window
[Trovester window: Since you don’t usually need the Trovester console window, you can start Trovester in “headless” mode. In the VirtualBox Manager GUI, right-click on Trovester, then select Start/Headless Start. Also, once you’ve started Trovester, it’s safe to close the VirtualBox Manager GUI until you need it again.]
to get it out of your way, but don’t close it, or you’ll shut Trovester down!If you ever wish to log in, say, to update the PhotoTrove code or run scripts, the user id is xyzzy with password
xyZZy!42. Feel free to change the password using thepasswdcommand. Note that you need not use the console, since you can log in remotely with your favorite secure shell client. To log out, typelogoutorexit. -
In your web browser, open
https://address/trove/where address is the Trovester IP address.
You’ll need to allow Javascript and accept cookies from PhotoTrove and, if prompted, accept the self-signed security certificate.
-
At the main screen, log in as xyzzy with the one-time password
phototrove. Change your password when prompted. The two built-in accounts, admin and useradmin use the same default passwordphototrove. Log out, then log in as each one and change those passwords as well. -
If you wish to add different user accounts, log in as
useradminand do so (Manage User Accounts). Users will need theeditandwalbumprivileges in order to make changes to the database (Grant Privileges to Users). -
All PhotoTrove operations are carried out using a regular user account like the default xyzzy or one you’ve added. You will never need the admin account unless you’re modifying the PhotoTrove code.
-
To import photos into Trovester, copy them into uniquely-named folders
[foldername]
inside themytrovester/public/originalphotos/folder. A good way to ensure unique names is to use date and time, for example20150105-232013. When you select Import a photo set from the main menu, the folders will be there to select. If you upload your photos as a zip or tar file, PhotoTrove will create a timestamped folder name for them (editable). -
Use the various tools to import and edit photosets and assemble photos into albums. When you complete an album to your satisfaction, use Publish albums to write it out as a set of static webpages. You’ll find the album in the shared folder under
public/albums/userid/(whereuseridis your PhotoTrove user name). You can burn this to a CD or DVD or upload it to a website; it will be viewable in a browser without needing PhotoTrove. -
When you’ve done what you wish with the published album, you might consider deleting the written copy to save disk space; the Publish albums tool has an option for this purpose. You can, of course, generate a fresh copy at any time.
-
When you finish your session with PhotoTrove, and any time you’ve made significant changes, it’s a good idea to export a copy of the database using the Export database tool in the main menu. Database dumps will accumulate in the shared folder under
public/dumps/but don’t worry; older ones get purged so there will never be more than 8 dump files. -
To shut down Trovester, open the VirtualBox Manager GUI, right-click on Trovester, then select either:
-
Close/ACPI Shutdown to initiate an orderly shutdown of all running services and finally the virtual machine itself, or
-
Close/Save State to freeze the virtual machine by completely saving its state to your local disk, similar to suspending a laptop computer by closing its lid. This takes only a few seconds. Starting it again later also takes seconds, and Trovester continues exactly where it left off.
-
-
When Trovester is fully shut down (VirtualBox’s list will indicate “Powered Off” or “Saved”), you can safely remove the device with the shared folder (if it happens to be a removable device).