1. EWOK Overview
1.1. About this document
Copyright © 2022 Theodore B. Ruegsegger. The source components of this document are written in asciidoc markup and used to generate a finished manual in HTML, PDF or other formats as needed.
1.2. The Problem: Constraining Motion
A major objective in many branches of engineering is constraining motion: we want a tool, a conveyance, a sensor, a prosthetic limb, whatever, to move in a certain way and no other. We have many ways to accomplish this, among which are mechanisms, arrangements of connected parts that move, transforming one motion into another. Mechanisms vary widely in complexity (and cost). Among the simplest are linkages, whose parts are connected with pivots and sliding joints. Since we’re very good at mass-producing inexpensive, precise, long-lasting bearings for rotation or linear motion, linkages have obvious advantages over, say, cams or hydraulic actuators.
A four-bar linkage is among the simplest linkages, a closed chain of rigid links, connected by pivots, that move in a plane (or parallel planes). One link is generally fixed in space, the two attached to the fixed link are cranks and the link connecting the cranks is the coupler. A common variation occurs when a crank’s attachment to the fixed plane is (conceptually) very far away, effectively at infinity, in which case the coupler end moves in a straight line; in practical terms, a sliding joint or slider replaces a crank.
The motion of a four-bar linkage’s coupler is complex, as two points a fixed distance apart have their individual motions constrained to circles (in the case of cranks) or straight lines (in the case of sliders). That said, it yields readily to mathematical analysis.
The reverse problem, synthesizing a four-bar linkage to guide the entire coupler (vs. just a point on the coupler) through a prescribed motion, is more tricky. It turns out that we can specify up to five specific precision positions of the coupler and design a linkage that will move the coupler through each position. Four- and five-position synthesis is mathematically complex and yields relatively few solutions, with no guarantee that any will be practical. Two- or three-position synthesis is much simpler and yields an infinite number of solutions from which to choose.
“Simpler” isn’t the same as easy or quick. In the old days, professional kinematicians spent long hours at the drafting table, laying out perpendicular bisectors and intersections of lines and circles, getting one solution at a time. And after finding a solution that, for one reason or another, doesn’t quite work, in which direction does a better solution lie?
Interactive computing has changed all that. Now we can specify the precision positions and then add centerpoints (fixed pivots, the ends of the cranks in the fixed plane), circlepoints (moving pivots, the crank ends attached to the coupler) and sliderpoints (sliders attached to the coupler but constrained to move in a straight line in fixed space). The software instantly displays the locus of solutions. As we move points, their counterparts (or loci) adjust in real time.
1.3. What is EWOK?
EWOK is an interactive graphic program for synthesizing four-bar linkages to produce specific coupler motions. You start by specifying the coupler motion graphically as two or three precision positions. As you add circlepoints, centerpoints, and/or sliderpoints, the program calculates the geometry of linkages whose couplers will pass through those positions.
Once you have a linkage designed, you can use the program to animate it, to see what happens between the precision positions. You can also sketch the actual or projected shapes of the coupler and the fixed frame to clarify how things will fit.
1.4. What Isn’t It?
It doesn’t yet handle concurrency points.
It doesn’t handle four or five precision positions, and likely won’t for the foreseeable future.
It doesn’t yet perform analyses like the Grashof condition.
That said, EWOK should be quite useful as it is, not just for its current capabilities but as a platform for enhancements. I’m grateful for any feedback on bugs, ideas for new features, or even code updates or patches.
1.5. Features
With EWOK, you can:
-
Specify the display scale (pixels per user unit) and the name for your units.
-
Reposition the display origin.
-
Constrain rotations to 5° steps.
-
Graphically design a four-bar linkage:
-
Specify the location and inclination of precision positions by moving and rotating a miniature x-y axis (click-and-drag).
-
Specify either a circlepoint or a centerpoint. EWOK will display the corresponding centerpoint or circlepoint locus (given two precision positions) or the point itself (three positions).
-
Specify a sliderpoint’s location on the coupler. EWOK will calculate the corresponding angle (direction of sliding) and rotate the point accordingly (two positions) or calculate the locus of sliderpoints, move the sliderpoint to the locus, and rotate it accordingly (three positions).
-
Rotate a sliderpoint to specify its angle (direction of sliding). EWOK will calculate the corresponding sliderpoint locus for that angle and position the sliderpoint accordingly, properly rotated.
-
-
Surround all points on the coupler with an automatically-generated frame to make it easier to distinguish between positions.
-
Add sketched shapes to the coupler and to the fixed frame to present a clearer picture of the constraints and eventual solution.
-
Animate your design:
-
Grab a circlepoint and drag to rotate the corresponding crank. The coupler and other components will move accordingly.
-
Grab a sliderpoint and drag it along its direction of sliding. The coupler and other components will move accordingly.
-
-
Save your design to disk.
-
Since version rel_20220520, EWOK saves and opens designs using JSON, not pickle. This avoids pickle’s security issues and makes conveniently indented, human-readable files.
-
-
Generate an html document describing all details of your design and, with a click, view it in a browser.
1.6. System Requirements
EWOK works on any platform where Python and Tkinter work. I’ve tested
it on GNU/Linux, Windows 10 and Mac. If you’re running it on a Mac,
you need some way to right-click (actually right-click-and-drag),
either plugging in a mouse with more than one button or trying the
various methods to simulate a right click, e.g.,
https://macpaw.com/how-to/right-click-on-mac
Your platform should have at least one web browser installed if you wish to view documentation or your generated design descriptions.
I have no idea whether it will work on a smartphone. I’m sure that question will come up.
1.7. History
This program began as a rewrite of a program I wrote in 1974, part of the KinSyn ("Kinematic Synthesis") series, for my Master’s thesis under the guidance of my thesis advisor and mentor Roger E. Kaufman, a brilliant and amiable fellow who still ranks high in the list of people I most admire. After I left, others added features to KinSyn and it achieved some recognition in the kinematics community but, sadly, it doesn’t seem to have made it far outside that sphere.
That’s a shame, because it’s a useful tool that any mechanical designer should have available. I’m not aware of any other product, free or proprietary, like it.
In 2001 I rewrote it entirely, replacing the FORTRAN (and the horrid coding practices I thought were funny at the time) with the Python programming language (http://www.python.org) and trading the ancient graphic devices for a modern monitor and mouse and the Tkinter interface that lets Python programs use the Tcl/Tk graphics. In honor of its history, I named it EWOK, a recursive acronym for "EWOK Was Once KinSyn." I also considered ERIKA (ERIKA Reflects Its KinSyn Ancestry) and some others too lame to mention. I welcome ideas for a better name.
The initial alpha release (2001) was very primitive and limited; I published it only because friends and colleagues expressed interest. I had every intention of continuing its development but life took me down other paths.
Now, another two decades later, I had a look around, figuring that someone, somewhere, must have taken it further or developed a similar application independently. To my great surprise and disappointment, I found nothing. If you know of anything like it, please let me know.
So I cranked up my aging brain, re-read Prof. Kaufman’s notes, re-read my thesis, re-learned how to do magic with complex vectors, had another look at my old FORTRAN code (yikes!) and got familiar with current Python coding practice and style guidance. I gave the whole thing an overhaul and turned it into what I hope is a useful application. It now does everything my original application did plus necessary things like saving designs to disk and changing the scale.
1.8. License
This collection of program code and documentation is free software; you can redistribute it and/or modify it under the terms of the GNU General Public License as published by the Free Software Foundation; either version 3 of the License, or (at your option) any later version.
This collection is distributed in the hope that it will be useful, but WITHOUT ANY WARRANTY; without even the implied warranty of MERCHANTABILITY or FITNESS FOR A PARTICULAR PURPOSE. See the GNU General Public License for more details.
You should have received a copy of the GNU General Public License along with this collection; if not, write to the Free Software Foundation, 51 Franklin Street, Fifth Floor, Boston, MA 02110-1301, USA.
2. Download and Installation
2.1. Getting Python and Tkinter
|
|
You want the latest version of Python (or at least a recent version of Python 3; Python 2 is still available for legacy reasons but won’t run EWOK). |
-
Install Python and Tkinter, if they’re not already available (typical GNU/Linux distributions already include Python and Tkinter or Tcl/Tk) A quick search in your favorite package manager should find the Tkinter package, though it might have a name like python3-tk. For Mac and Windows you can download an installer from https://www.python.org/downloads/
-
Install the package/run the installer. Done.
2.2. Getting EWOK
-
Download a ZIP archive, either:
-
Unzip it to a convenient empty folder.
3. Running EWOK
3.1. Setting Up
-
Start EWOK:
-
GNU/Linux or Unix with X11 running: in the directory where the files reside, the executable main program is ewok.py. Start it by double-clicking on it or, from the command line, typing:
[path]ewok.py or python3 ewok.py -
Windows: In the directory where the files reside, double-click on ewok.py
-
Mac: My limited experiments with a Mac had mixed results. Two things that worked were:
-
Opening a terminal and typing python3 ewok.py
-
Using “Python Launcher” to run ewok.py.
-
-
-
Adjust screen size, if necessary. EWOK should sense how big your display is and start up with a reasonable size, but you can adjust this. If you do, you’ll want to set the scale (below) even if you don’t change it. You’ll probably also want to move the origin (also below).
-
Set the scale from the View menu. You can specify pixels per unit (default 100) as well as the name for your preferred unit (default “ft”).

The unit name is just for your convenience; EWOK doesn’t do any unit conversions, but does need to label the coordinate axes.
-
Set the origin to a convenient spot on the canvas: from the View menu, select Set Diagram Origin and click on the canvas where you want it.
3.2. Designing a Linkage
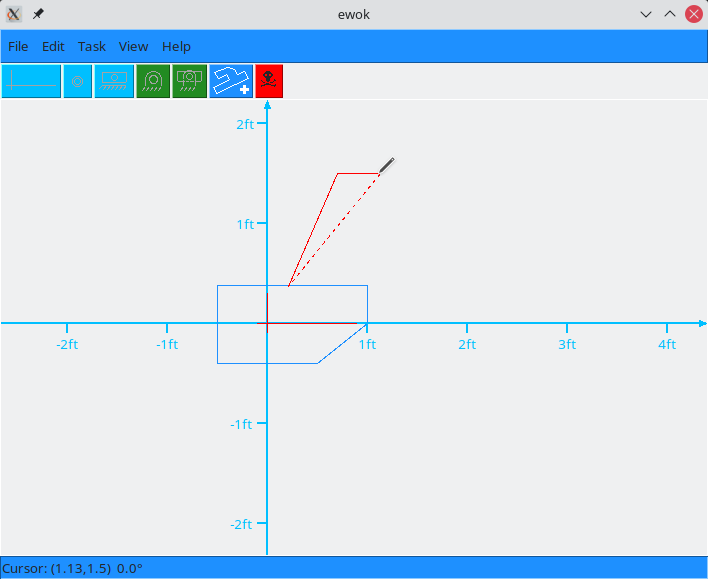
For example, a crank-slider linkage for two precision positions:
-
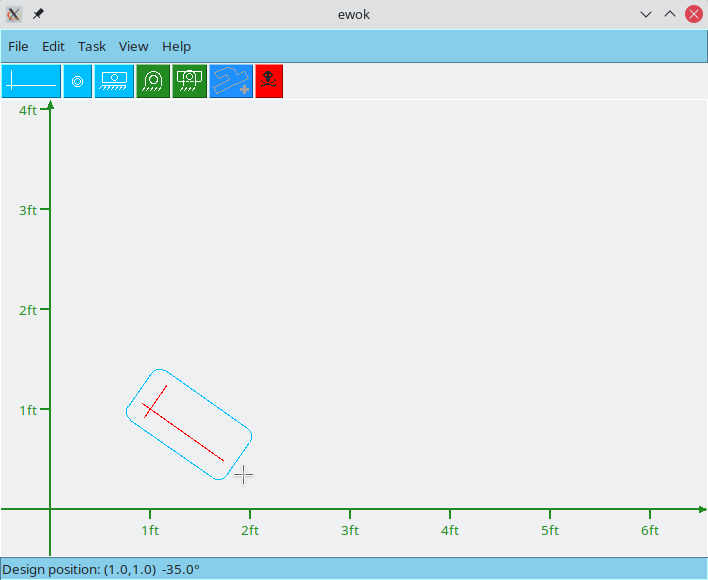
Specify precision positions: From the Edit menu, select Add Position (or click on the axis icon in the toolbar. Click on the canvas. An axis glyph will appear. Drag it to the desired location and release the mouse button. This is the design position.


As you move the axis, the statusbar at the bottom displays the location and angle.
-
Right-click near the axis at the design position and drag to rotate it, setting its angle.
When rotating position axes or sliderpoints, you may find it convenient to set the angle to a round number of degrees. If so, select Rotate in 5° Steps from the View menu. This also applies to rotating cranks when animating a linkage.
-
Specify the second precision position the same way. Optionally, specify a third position.
Finish specifying design positions before adding links or sliders.
-
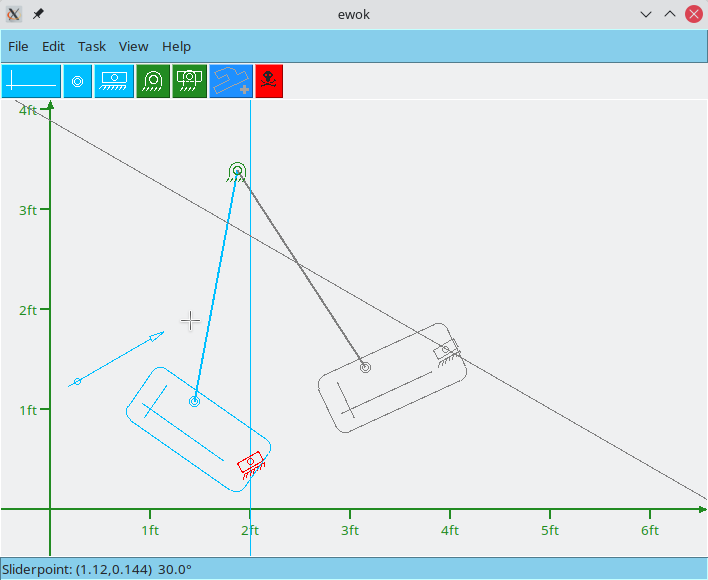
Select Add Circlepoint or click the circlepoint icon in the toolbar, and specify a circlepoint on the coupler. In the two-position example shown here, EWOK continuously recalculates and displays the locus of centerpoints that will work with the specified circlepoint.
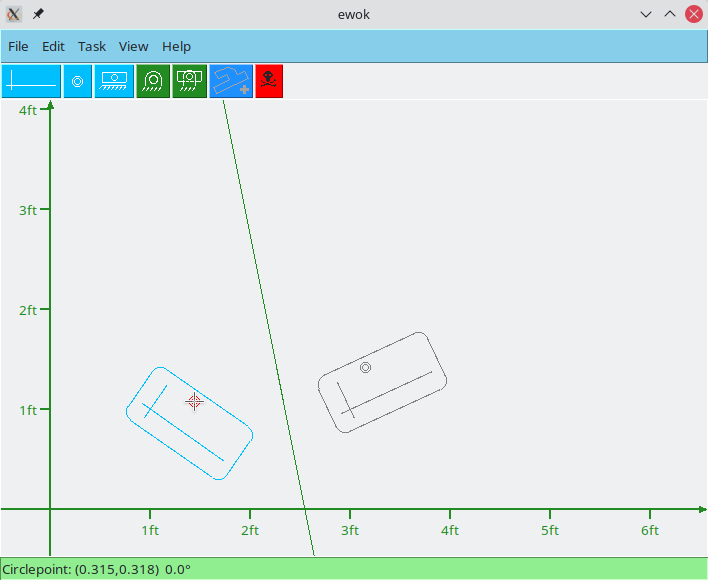
The coordinates of pivots attached to the coupler (circlepoints and sliderpoints), displayed in the status bar at the bottom of the canvas, are in the coupler’s frame of reference, not the fixed frame.
-
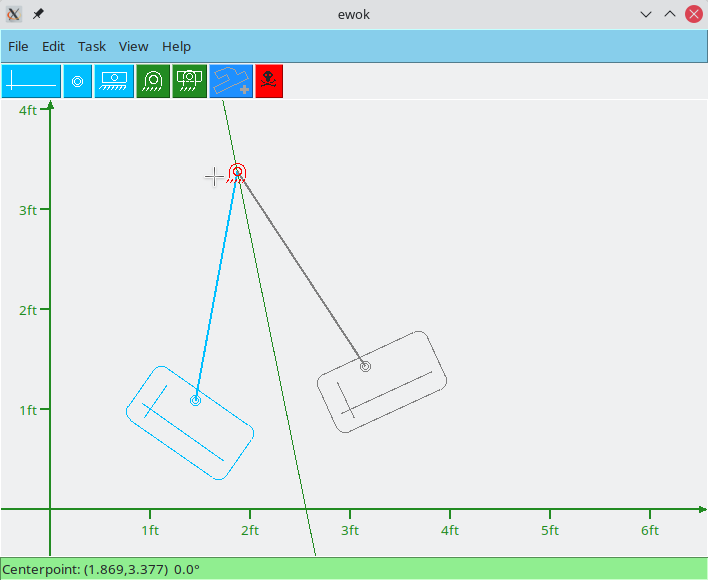
Add a centerpoint from the menu or toolbar and Ewok will constrain it to the calculated centerpoint locus.
-
Add a sliderpoint.
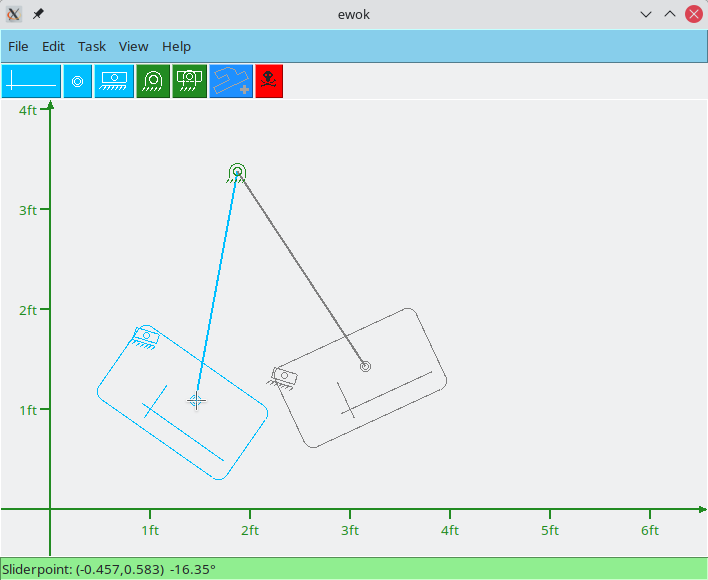
The coupler frame is a visual aid to make it easier to tell which items are on the moving coupler and which aren’t. It stretches to fit. You can turn it on or off from the View menu. You can also specify the coupler’s actual shape using the sketch tools described later.
-
Right-click on the sliderpoint and rotate it to set its sliding direction. EWOK will display an arrow-shaped dial which rotates in place to indicate the angle, at the same time displaying the sliderpoint locus corresponding to that sliding angle and placing the sliderpoint on the locus.
3.3. Animating the Linkage
-
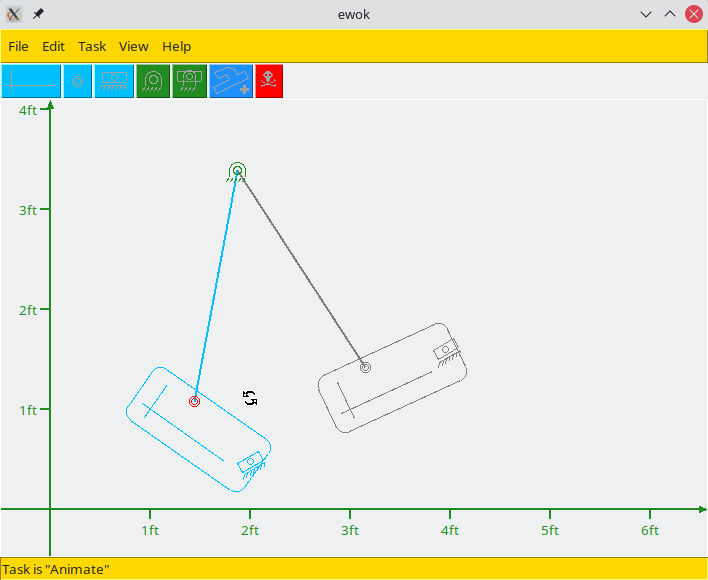
In the Task menu, select Animate. Note the change in color scheme and the different cursor.
-
Animate the linkage by either: grabbing the circlepoint to rotate its link, or grabbing and sliding the sliderpoint.
If rotating the link feels “choppy” check to be sure Rotate in 5° Steps is turned off in the View menu.
-
When you’re satisfied with the design, be sure to save it to disk (File menu).
As with any software application, it’s a good idea to save often, in case a mis-click accidentally changes your design. Yes, adding an Undo feature is on my to-do list.
3.4. Editing a Linkage Design
Another example, this time for three precision positions:
-
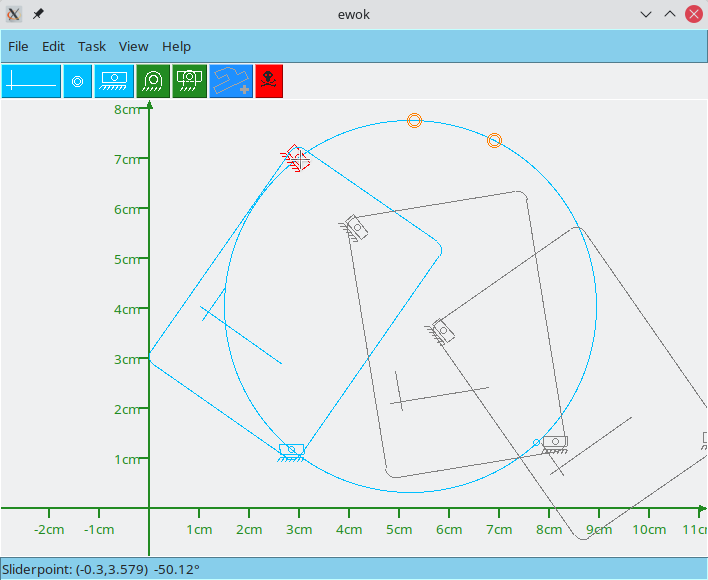
Specify three positions as before, then add a couple of sliderpoints. Note the circular sliderpoint locus.
-
Animate the linkage. Note that one slider moves through all three positions while the other works best as a follower.
-
Save the design.
-
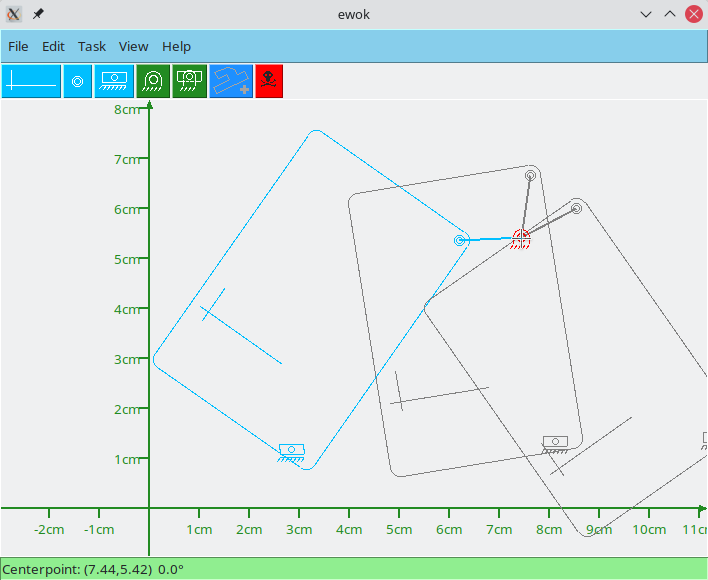
Switch back to Design (Task menu). Delete the follower sliderpoint (select Delete Object from Edit menu or click the skull-and-crossbones icon in the toolbar), then click on the upper sliderpoint at its design position (highlighted in blue until the cursor moves near it, then red). The sliderpoint vanishes, along with its projections in the other positions. Then add either a circlepoint or a centerpoint. This time there’s no locus; there’s only one centerpoint for each circlepoint and vice-versa. EWOK adds it and moves it to track its counterpart, displaying the link as it does so.
-
Now switch to Animate and see how this linkage compares with the double-slider design.
Hmmm….Rotating the crank clockwise hits only two positions; counterclockwise hits the first position once, then oscillates between the second and third. And now the slider moves the coupler past the second position but doesn’t reach the third before the crank stops it.
Which design is better? It depends what the linkage is to accomplish.
-
Remember to save your design (under a different name if you want to preserve the first try).
4. Sketching Physical Shapes
4.1. Improving Visualization
The display can get a bit cluttered and it’s sometimes difficult to tell which screen object belongs to which position. The automatically-generated coupler frame helps a bit, but we need a way to depict the actual shape of the coupler as well as what the fixed-frame objects surrounding the linkage look like. Some of these shapes are predefined aspects of the intended environment or the stated requirements, but many are conjectural and will change as the design evolves.
In aid of this, EWOK provides a simple facility for drawing sketches, simple polygons attached either to the fixed plane or the coupler.
4.2. Sketching in the Fixed Plane
-
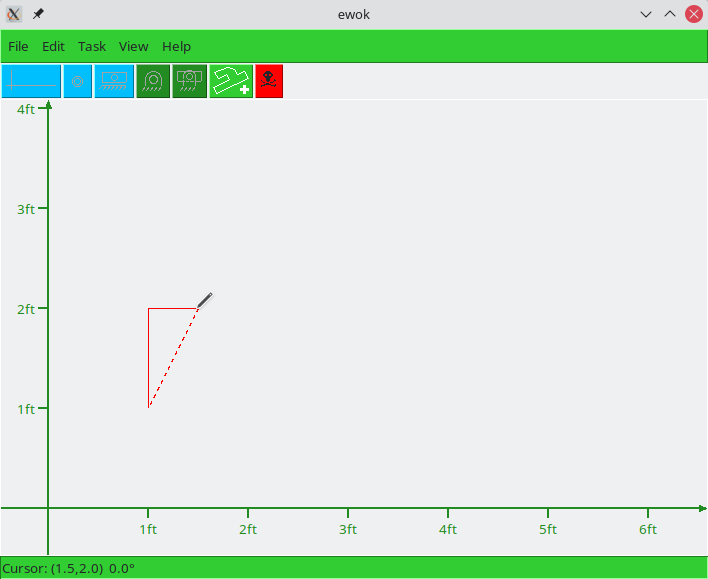
From the Task menu, select Sketch Fixed Frame. Then select Add Sketch from the Edit menu or click the Add Sketch icon (an irregular shape and a plus sign, green in this case) in the toolbar. The cursor will change to the shape of a pencil. Click left to add points to the polygon. As you add each point, EWOK will connect it with a dashed line to the first point, completing the polygon.
-
If you hold down the left mouse button, you can keep moving the point to make any final adjustments.
-
Once you release the button, the point is fixed.
-
Clicking right erases the last point and now moves the previous point.
-
-
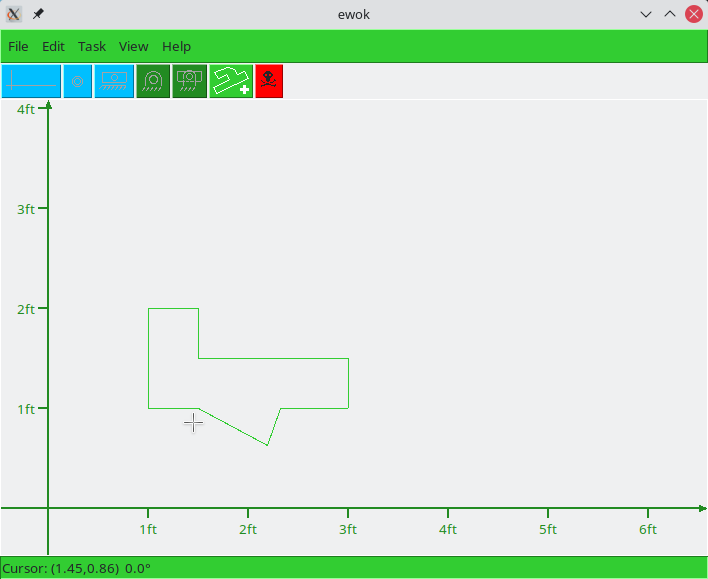
When the shape looks right, double-click to add a final point and add the finished polygon to the list, in this case for the fixed plane. It will change color and the cursor will return to the default crosshair.
-
Continue adding sketches as needed, selecting Add Sketch each time to get the pencil cursor.
-
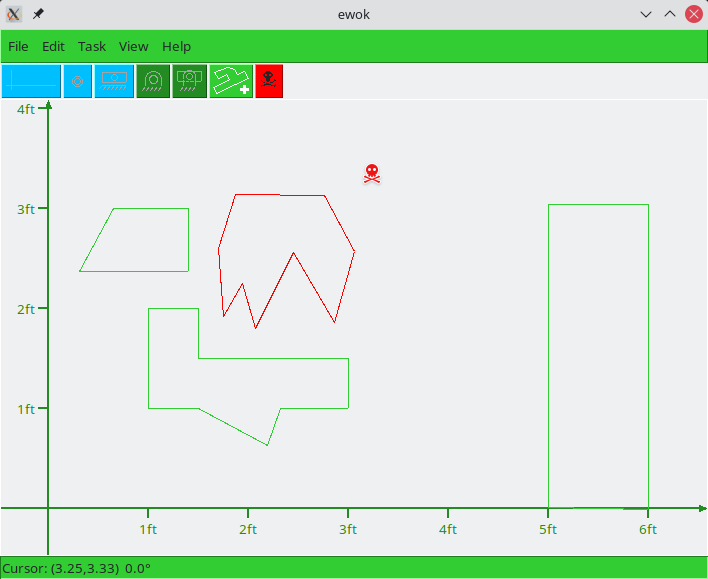
You can delete any sketch from the list by selecting Delete Sketch from the Edit menu or clicking the skull-and-crossbones icon in the toolbar. Move the cursor toward the target sketch until it turns red, then click.
4.3. Sketching in the Coupler’s Plane
-
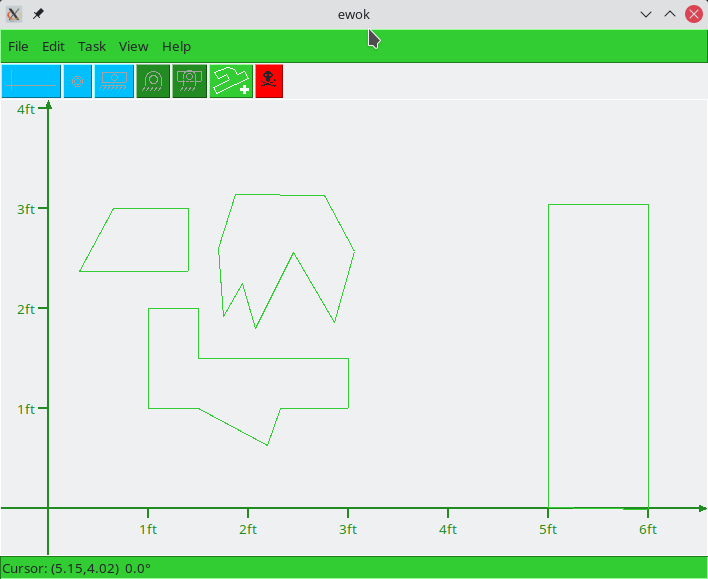
From the Task menu, select Sketch Coupler. What’s different now is that the coordinates are in the coupler’s frame, unrotated, and there’s a reference axis at the origin. You may wish to move the origin (View menu, Set Diagram Origin) to ensure you have room around the coupler. As before, select Add Sketch or click the Add Sketch icon (now blue) to get the pencil-shaped cursor, then add points to make one or more polygons.
4.4. Linkage Design with Sketches
-
From the Task menu, switch to Design. The fixed-frame sketches show up there, as expected. Turn off Frame Coupler Points from the View menu, then add a position. The coupler sketches follow the axis as it moves.
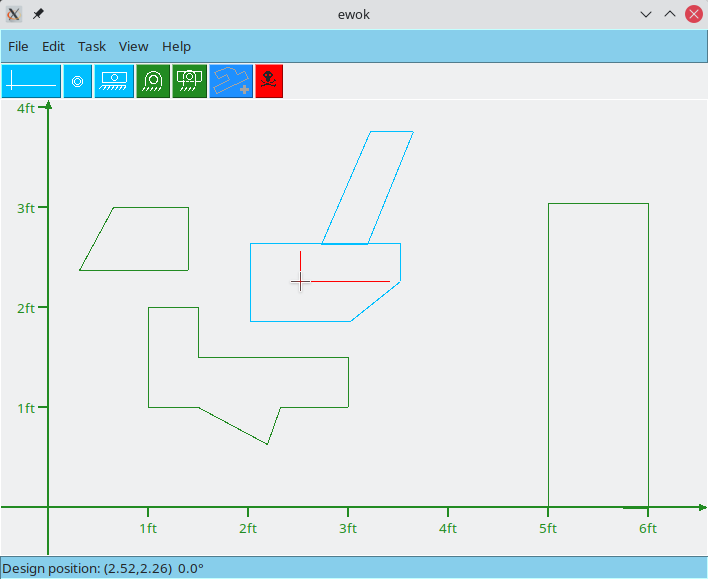
And of course they rotate with the axis, too.
-
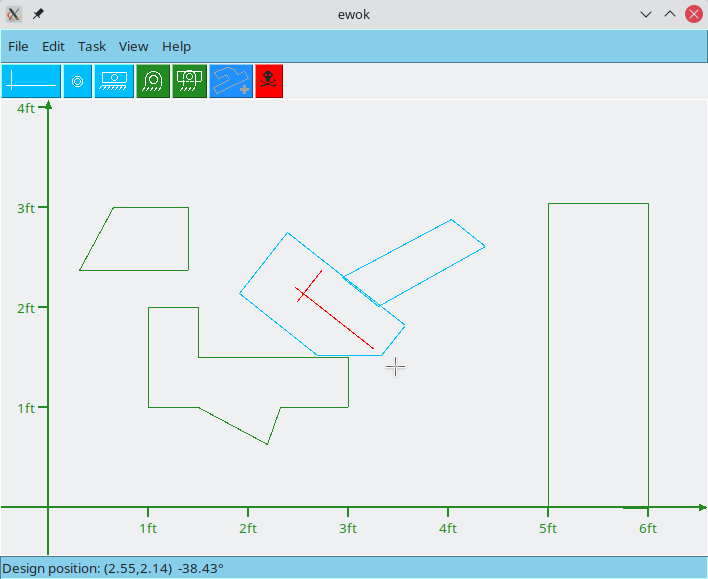
Add a second position, then complete the linkage with, say, a couple of sliderpoints, and animate it.

4.5. Another Example
Here’s a pipe-clamping mechanism:
5. Saving and Documenting a Design
5.1. Saving Your Design
As with any software application, it’s a good idea to save often, in case a mis-click accidentally changes your design.
Saving a design is easily accomplished:
-
From the File menu, select Save Design. EWOK will prompt for a file path.
-
Enter a file path or select an existing file and click Save.
-
EWOK saves and opens designs using JSON. This makes conveniently indented, human-readable files. Here’s an example.
-
To help you remember, EWOK puts the filename into the application titlebar.
-
You’ll probably want to save numerous versions as you close in on the final design.
-
Opening a saved design is just the opposite:
-
From the File menu, select Open Design. EWOK will prompt for a file path.
-
Select the desired file and click Open. EWOK will load the design.
-
It’s quite safe to open an EWOK design someone else sent you. Early releases of EWOK saved designs using the "pickle" format. Since it’s possible for malicious persons to inject executable code into a pickle file, opening a pickle file received over the network can be risky. JSON doesn’t have this problem and, in fact, EWOK’s JSON files are readily reviewable by humans.
-
To help you remember, EWOK puts the filename into the application titlebar.
-
5.2. Documenting Your Design
To generate an html document capturing all the details of your design:
-
From the File menu, select Describe Design. EWOK will prompt for a title for the document.
-
Enter a descriptive title and click Continue. EWOK will prompt for a file path.
-
Enter a file path or select an existing file and click Save. EWOK will generate and save the document, then pop up a box with a link to the document.
-
Click on the link and the generated document should open in your web browser, for example:
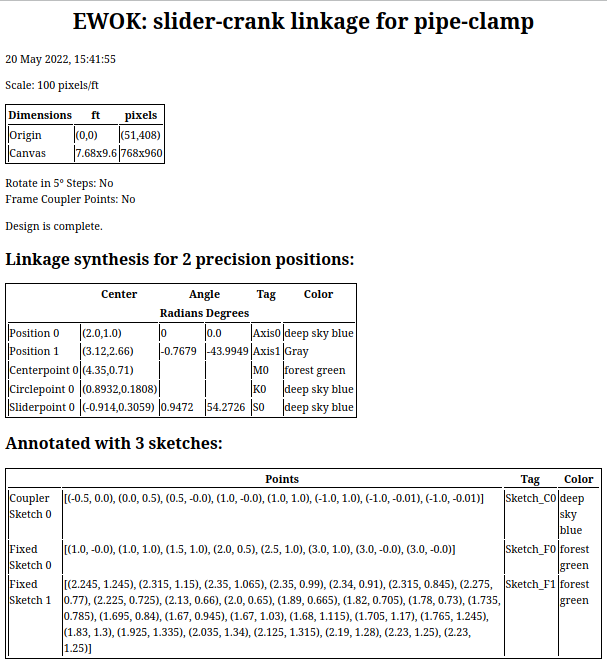
In the html document, coordinates and angles are rounded to 4 decimal places. If you need a different precision, edit global_constants.py and change DEFAULT_PRECISION to suit.
In the regular saved (JSON) files, all values are unrounded.